There are so many cloud hosting providers available to host your WordPress Website. After DigitalOcean, undoubtedly Vultr is another best Cloud hosting platform. It does offer SSD VPS Servers, Cloud Servers, and Cloud Hosting. And, if you’re planning to host WordPress on Vultr Cloud Server. Then, this article covers from deploying a Cloud Server to Installing WordPress on it.
Yes, Vultr gives an easy one-click option to deploy OpenLiteSpeed WordPress on Ubuntu 22.04. But, we will deploy CybelPanel on Ubuntu. Which will auto-install the OpenLiteSpeed Server. After that, we will access CyberPanel and will install WordPress with the LiteSpeed Cache plugin. There are lots of benefits of using CyberPanel Control Panel.
What are CyberPanel and OpenLiteSpeed (OLS)?
CyberPanel is a web hosting control panel, which is powered by OpenLiteSpeed. And, OpenLiteSpeed is a free and open-source web server used for individual sites. Since you have to restart the server to load any new or updated .htaccess file.
With CyberPanel, you can set up your Website or Blog and Install WordPress and other alternatives. During WordPress Installation, CyberPanel auto-install Let’s Encrypt SSL for free. Moreover, you can perform website redirection and change the PHP Version.
Even, you can access the file manager using CyberPanel. Yes, you can easily create a backup and restore a Website using the CyberPanel Control Panel. Overall, CyberPanel offers so many advantages, which will you know when you start using it. Yes, you can also Install WordPress on CyberPanel on DigitalOcean.
Contents
Install WordPress on Vultr using CyberPanel
Deploy a Server on Vultr.
- Log In to your Vultr Account. Or, Sign Up using the following link, you will get $100 to test Vultr.
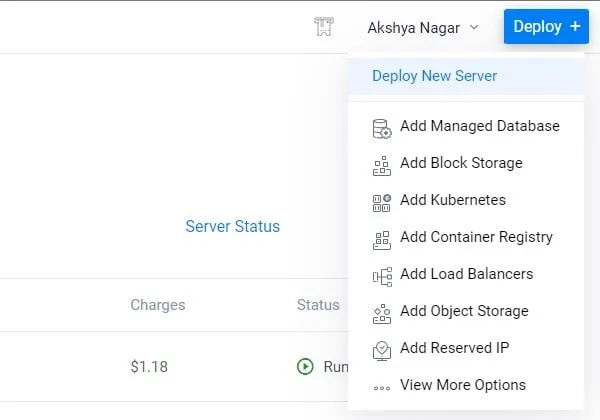
- Once you complete the SignUp process and log into your Vultr Account. Click on Deploy > Deploy New Server.
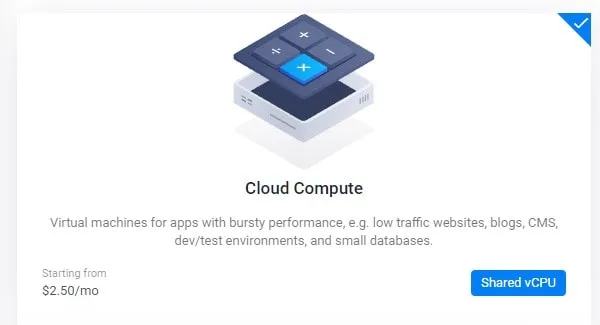
- Deploy New Instance WebPage will get open. Select Cloud Compute, it is suitable low low-traffic Websites and WordPress Blogs.
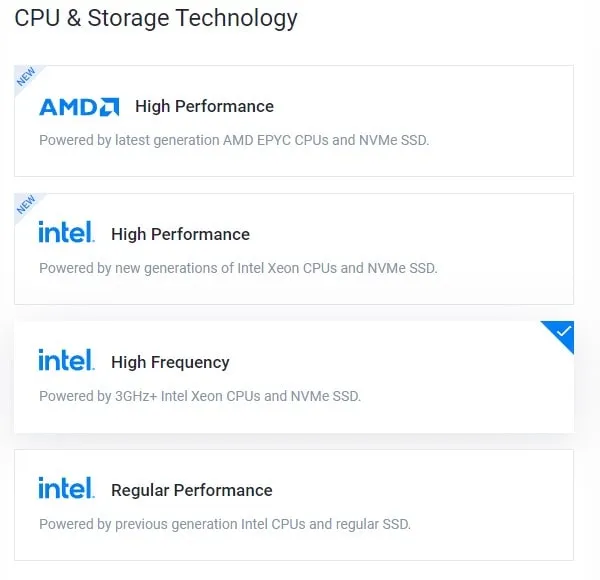
- After that, scroll down and select the “Intel High Frequency” option. It is powered by 3GHz+ Intel Xeon CPUs and NVMe SSD.
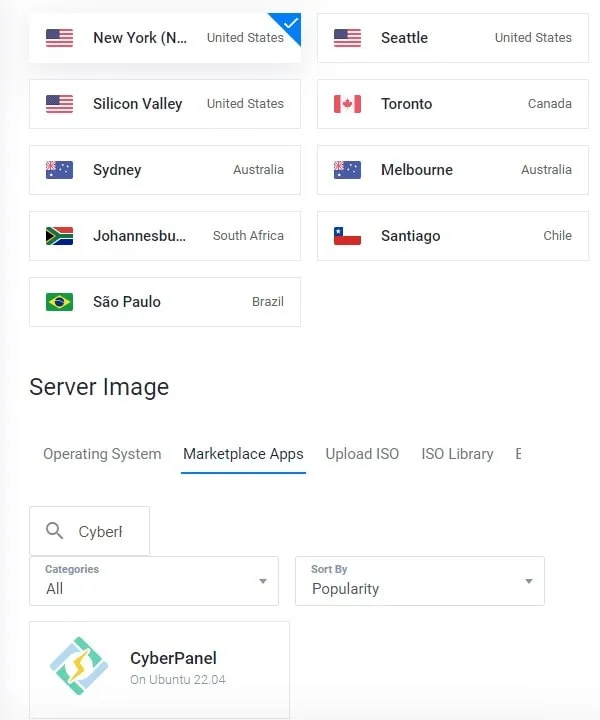
- Next, scroll down and select a server location. (The server location should be near to your Website or Blog target audience.)
- Now, in the Server Image section, click on MarketPlace Apps. And, do search for CyberPanel. Select “CyberPanel on Ubuntu 22.04” option.
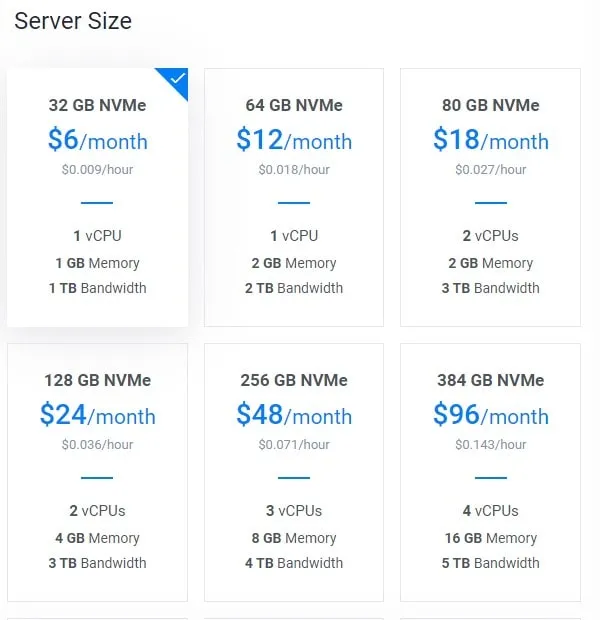
- Scroll down and select the $6/Month Plan. (You can select better plans if you are going to target a large audience through your Website or Blog.)
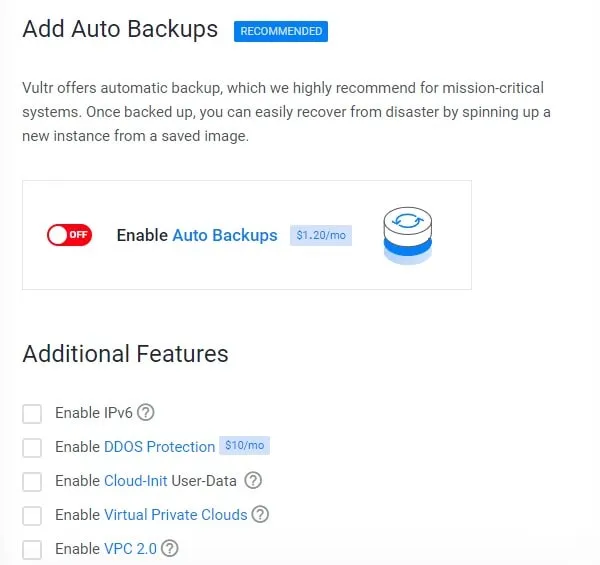
- Scroll down and disable Auto-Backup. (You can enable it if you like, but it will cost you a few bucks.)
- Next, no need to enable any Additional Features.
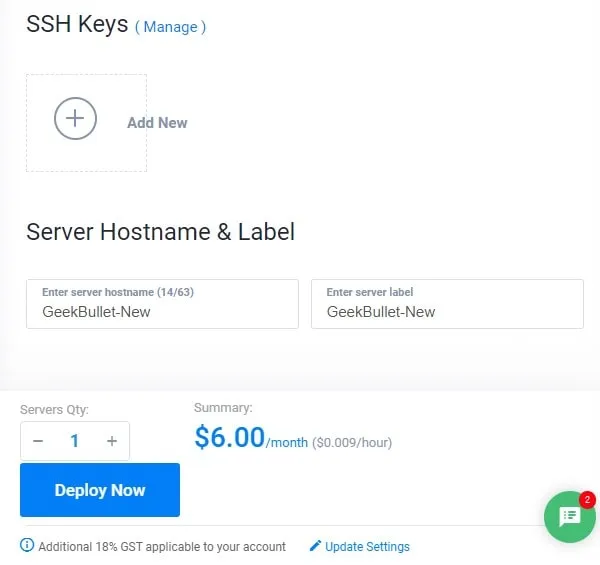
- Enter your server hostname. Do enter your website/blog name and click on Deploy Now.
Setup your DNS
Once the server successfully gets deployed, you will get an IP address. Now, it’s time to link the domain to the IP Address.
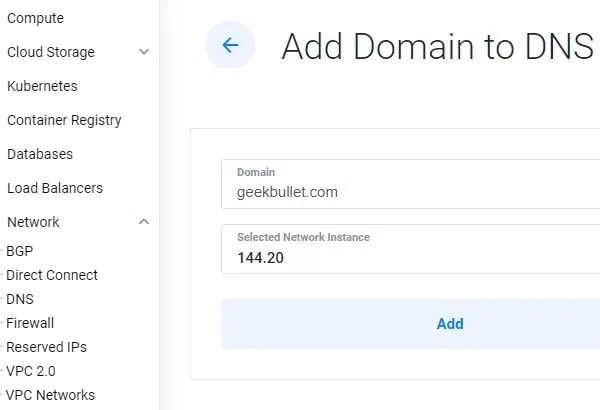
- In Vultr, go to Network > DNS.
- Click on Add Domain to DNS.
- Enter your domain name and select your server IP address. Click on Add.
- Now, you have to add Vultr Nameservers to your Domain Name Provider.
- Do visit the website from which you have purchased your domain. Go to DNS Settings > Custom Name Servers. And, do add Vultr Name Servers details.
ns1.vultr.com
ns2.vultr.com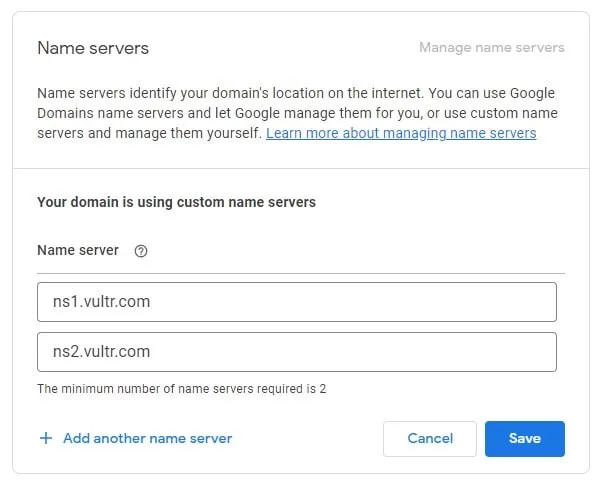
Note: Since I am using Google Domains, I added Vultr nameserver details to it. So that, now i can manage DNS records directly from Vultr DNS settings.
- If you want to use WWW before your domain name. Then, you can also add the WWW CNAME Record in Vultr DNS Settings.
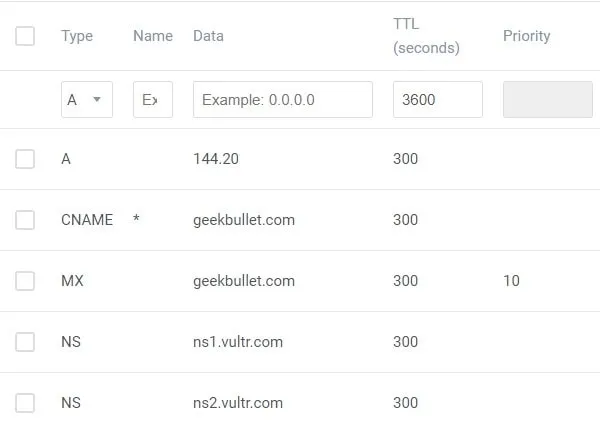
That’s it, once you have completed the DNS Setup. After that, you can use the DNS Checker website to check domain name is pointed correctly to the Server IP address or not. Yes, It can take time depending on the domain provider.
Find CyberPanel Login Password
- Open Vultr again, and click on Server Name.
- You will now find a username and password to Log in to Console.
- Click on View Console.
- The Console window will open. Do enter your root as username. After that, enter the password. (When you enter the password it will be not visible.)
- Once you log in as root user. Type the following command to find the CyberPanel Password.
sudo cat .litespeed_password- Once you find out the CyberPanel Password, open the following URL to access CyberPanel. Make sure to replace the IP address with the actual ID address of your server.
https://IP Address:8090- The “Your Connection is Not Private” screen will now appear. It will give you an SSL Warning. Click on Advanced > Proceed to IP Address.
- The CyberlPanel login page will open. Do enter admin in username. And, in the password enter the Litespeed Password that you got from the web console. Click on Sign In.
Create a Website in CyberPanel
Before we create a website inside CyberPanel. First, make sure the domain is hitting the IP address correctly. Like, I mentioned earlier, you can use the DNS Checker Website. You can also access CyberPanel using your domain instead of IP.

- Go to Websites > Create Website.
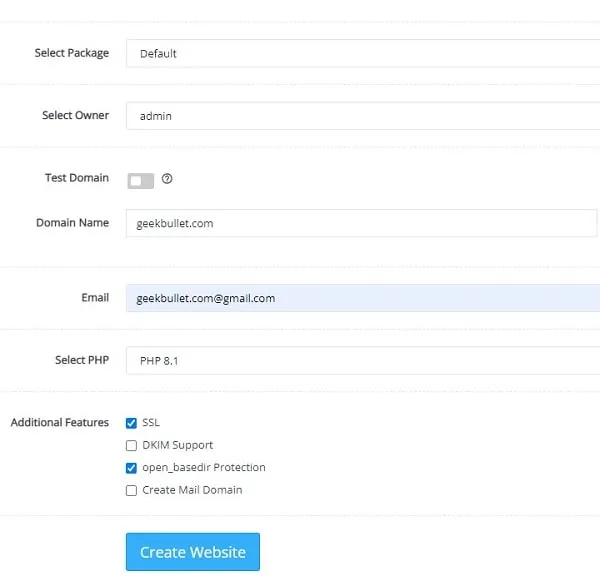
- Turn the Test Domain off. In Select Package, select Default.
- After that, Select the admin in the Select Owner.
- In Domain Name, enter your website address without www. After that, Enter your Email address. After that, Select the most recent PHP version.
- In Additional Features, select SSL and open_basedir protection.
- Click on Create Website.
- A progress bar will appear. And, you will see the “Website Successfully Created” Message.
Do open your website domain in the new Chrome tab. And, you will see the “CyberPanel Installed” Message. As you can see SSL is also installed. Now, we will install WordPress. But, before that, first, we will issue hostname SSL.
Issue Hostname SSL
- From the left pane, click on SSL > Hostname SSL.
- Select the website and click on “Issue SSL”.
- SSL will get issued within a few seconds.
- Now, log out from the CyberPanel. And, open a new tab and access CyberPanel using the domain.
https://domain:8090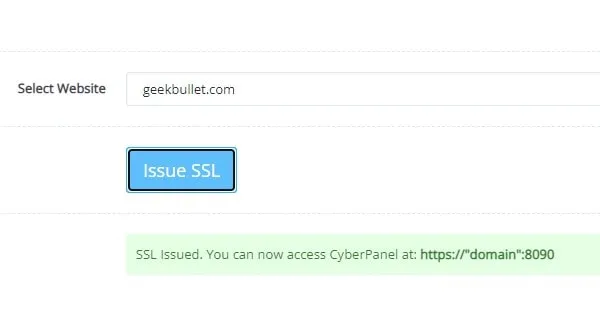
- Use the same LiteSpeed password that you’ve used before.
Install WordPress on your Website
Since CyberPanel is installed correctly, now it’s time to install WordPress through CyberPanel.
- Once you’re logged in to CyberPanel using Domain. Go to Websites > List Website.
- Site details will open that you’ve created, click on Manage.
- CyberPanel will first show you the SSL certificate that will expire in 89 days.
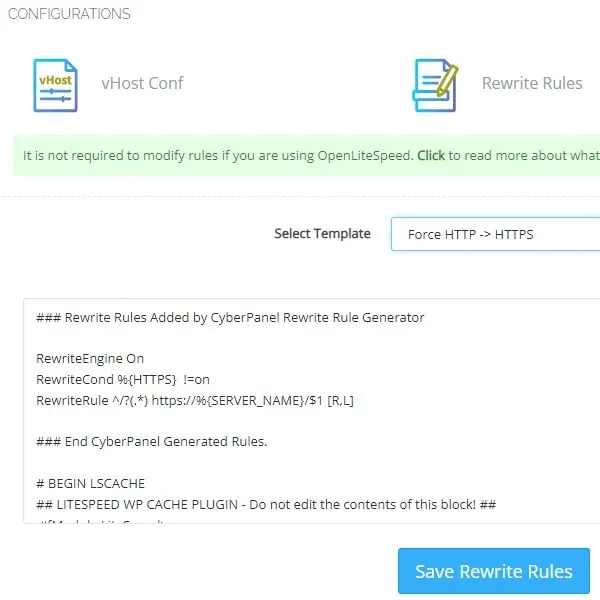
- Scroll down and click on Rewrite Rules.
- From Select Template, do select “Force HTTP > HTTPS”. And, click on “Save Rewrite Rules”. Here we are redirecting the website URL from Non-Https to Https.
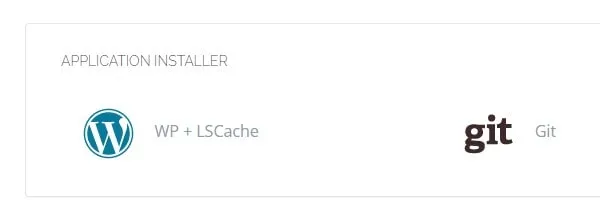
- Scroll down and you will see Application Installer. Click on WP + LSCache.
- The Install WordPress page will open. Enter your blog title, login username, and password. After this, enter your email and click on Install Now.
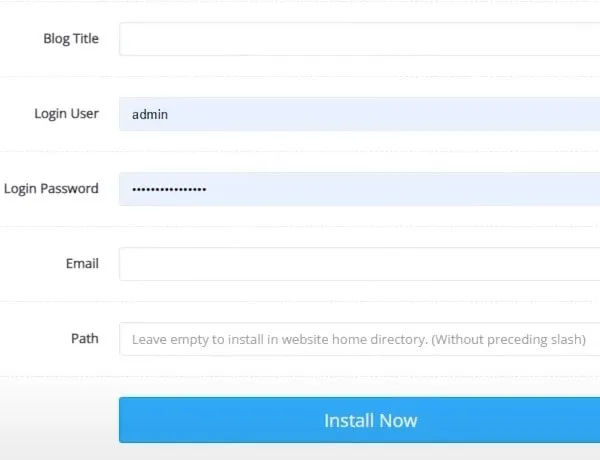
Note: Leave the Path Empty. So that, WordPress will get installed into the home directory. Also, save your WordPress username and password somewhere safe, before you hit the “Install Now” button.
- Within a few minutes, WordPress will get installed. And, you will get Sucessfully Installed message.
- That’s it, now you can log in to your WordPress site. And, can customize your website using themes and plugins.
https://domain/wp-admin- Replace the domain with the actual domain name of your website. After that, you can log in using your WordPress login details.
That’s how you can Install WordPress on CyberPanel On Vultr. If you’re facing any issues during the setup, let me know in the comment section.