Lock Screen was first introduced in Windows 8, by Microsoft. Later Windows Spotlight was added to the Lock Screen. And, now in Windows 11, you get many options to personalize the Lock Screen. Which you can access this by going into Settings > Accounts > Sign-in options > Lock screen personalization. And, you can even choose an app to show detailed information on the Lock screen. The lock screen also acts as a security measure to prevent unauthorized access to your computer. Because It appears right before the sign-in screen. But still, many users want to access their desktop quicker. And, wants to disable the lock screen on Windows 11.
Since the lock screen is now an integral part of Windows. That’s why Microsoft doesn’t offer any direct option to remove the lock screen in Windows 11 through the settings app. But still, with the help of the Group Policy Editor and Registry Editor, your can turn on/off the Lock screen easily. And, this article will help you with it. So, let’s get started.
Note: Removing the lock screen will not boot your straight to the desktop. For that, you have to disable Windows all sign-in options. Methods mentioned in this article will only disable Windows Spotlight and Lock Screen.
Remove or Disable Lock Screen on Windows 11
Disable Lock Screen using Group Policy Editor
Group Policy Editor or GPE is a Windows administration tool to manage many important settings on computers. Although, it is not available for Windows 11 Home users. But, still, you can Enable Group Policy Editor (Gpedit.Msc) In Windows 11 Home Edition. Yes, Windows 11 settings app doesn’t provide the option to turn off the lock screen. But, thankfully GPE has an option to do so.
- Search for “Edit Group Policy” in Windows 11. And, once search result appear, click on Open.
Alternatively, do press the Windows + R key to open Run Window. And, type Gpedit.Msc in it and press enter.
- Local Group Policy Editor window will get open. Now from the left panel double-click on Computer Configuration to expand it.
- After that, go to the following directry.
Administrative Template > Control Panel > Personalization.
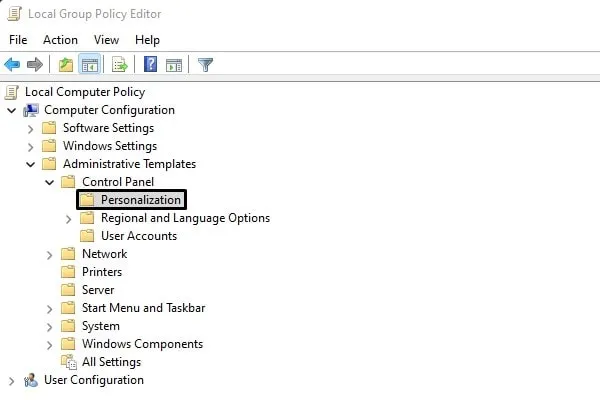
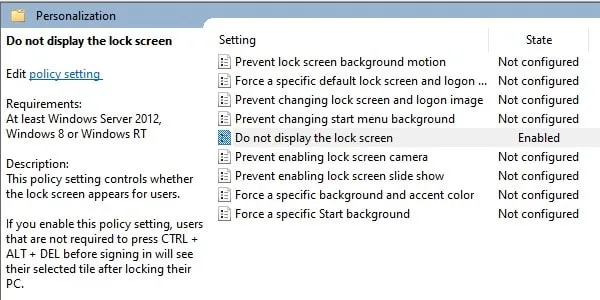
- Once you select Personalization, in the right panle you will see a policy labeled as “Do not display the lock screen”.
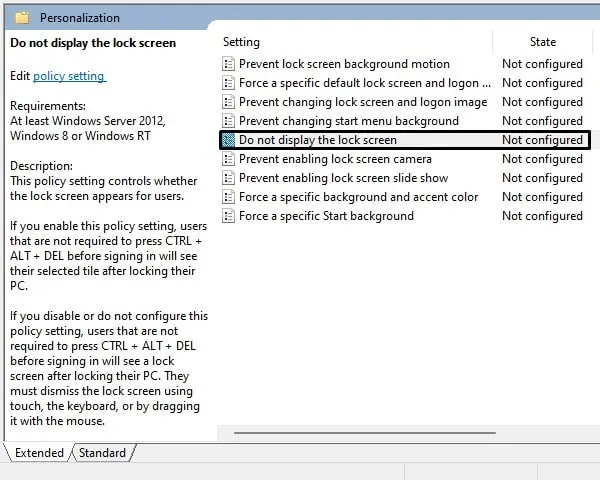
- Do double click on it. And, a new window will get open.
- Select “Enabled” option in it. And after that, click on Apple, then ok.
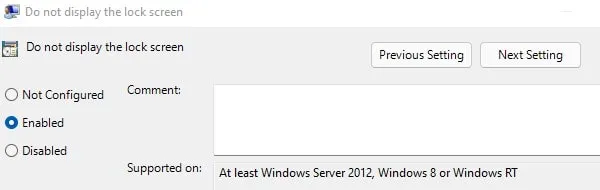
- Now, do not display the lock screen state will get changed to enabled.
That’s it, now restart your Windows 11 PC/Laptop to changes to take effect. You will now notice that the lock screen got disabled and the sign-in window got opened directly.
Turn On/Off Lock Screen using Registry Editor
Lock Screen in Windows 11 also can be disabled through Registry Editor. If you’re on Windows 11 Home Edition, then this method is especially for you. Because, as I mentioned earlier, GPE is not available officially for the home version of Windows.
If you’re not aware, Windows Registry Editor (Regedit) is a graphical tool to view Windows registries and make changes to them. With Windows Registry, you can enable or disable many Windows features, even can add new custom features. Although, making unnecessary changes in registry settings can be dangerous to Windows.

Note: If you have already followed the first method then you don’t need to follow this method.
- Press Windows + R key to open run Window. Do type RegEdit in the Run window and do press enter.
UAC window will appear, click on Yes.
- Once Registry Editor gets open. Do copy the following directory and paste it in the address bar of Registry Editor.
Computer\HKEY_LOCAL_MACHINE\SOFTWARE\Policies\Microsoft\Windows- After that, do right-click on Windows from the left panel of Registry Editor. And, select new > key.
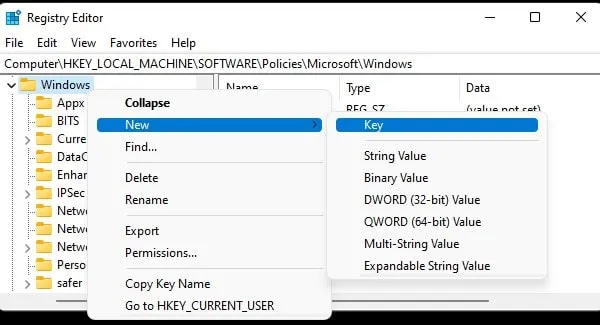
Rename the new key with Personalization. And, click on Personalization to select. Now, this will be your new directory.
Computer\HKEY_LOCAL_MACHINE\SOFTWARE\Policies\Microsoft\Windows\Personalization- Now, on the right panel, do right-click and select new > DWORD (32-bit) Value.
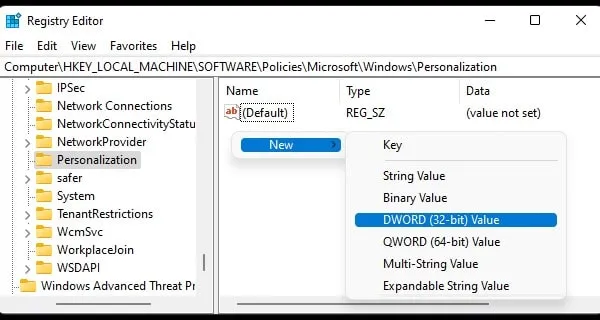
- Rename the new value to NoLockScreen.
- Double-click now on NoLockScreen value and then in value data, type 1, and click on ok.
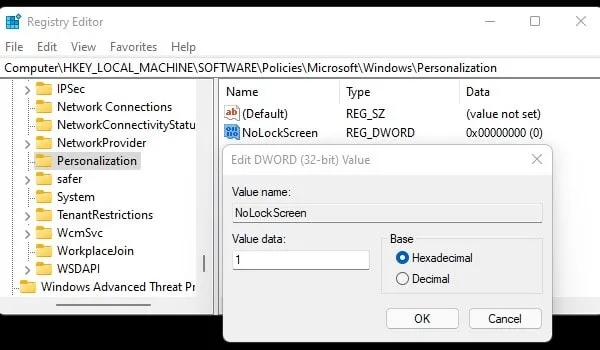
That’s it, now you can close Registry Editor. Also, do restart the window, and you will find out that the lock screen got disabled. If you want to enable the lock screen again, then just change the value to 0. Ok, so that’s how you can directly go to the login screen. Both methods work similarly. It’s just GPE that gives you an easy option to disable the lock screen in Windows 11.