Microsoft first introduced Copilot through Microsoft Edge, which offers AI-powered browsing. And, if you’re on Windows 11 version 23H2, you can find Copilot on the right side of the Taskbar. Yes, if you want you can completely disable Copilot in Windows 11. Or, can just remove it from Taskbar. However, before you disable it, first you should know, what it is.
What is Copilot (Preview)?
Copilot is an AI-powered Chatbot Developed by Microsoft. Yes, it is the primary replacement for the discontinued Microsoft Cortana. Since it is based on a newer GPT-4 large language model (LLM). It is also integrated into Microsft 365. Copilot can be quite useful when you are learning a new programming language. Since it gives very accurate and concise answers to your questions. You can access Copilot from Taskbar, Bing, or by pressing the Windows + C keyboard shortcut.

With it, you can change system-level settings like enabling do not disturb. You can upload an image and ask questions about it. The best part is that it also offers an AI Image Generator. You can connect it across Windows Apps. Overall, Copilot can make your Windows experience better.
However, if you don’t want to use it. Or, if it is causing you any issues. Then, you can disable it using Group Policy Editor, Registry Editor, or MSEdgeRedirect. Or, if you don’t want to disable it, then you can simply remove it from the Taskbar.
Contents
Disable Copilot on Windows 11
Method 1: Remove Windows Copilot from the Taskbar
- Do right-click on the Windows 11 Taskbar. And, after that, click on Taskbar Settings.

- The Taskbar Settings page will open. Now, from Taskbar items, turn off “Copilot(preview)”
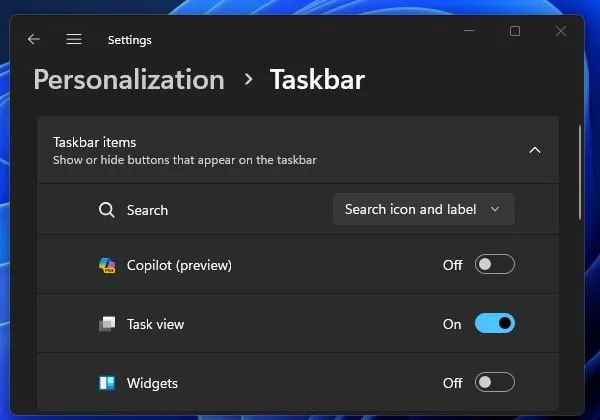
- That’s it, The Copilot icon will now get removed from your Taskbar.
- To completely remove Copilot from Windows, follow the next methods.
Method 2: Disable Copilot using the Group Policy Editor
If you’re using Windows 11 23H2 Pro, Enterprise, or Education Edition. Then, you can disable Copilot by editing local group policies. However, if you’re using Windows 11 Home Edition. Then, you will not find GPE in your system. In that scenario, try the next two methods.
- Open Windows Search, type “GPE” and click on “Edit group policy”.
- Local Group Policy Editor will get open.
- Now, do open the following directory.
User Configuration => Administrative Templates => Windows Components => Windows Copilot- Inside the Windows Copilot folder. You will see a local policy named. “Turn off Windows Copilot”.
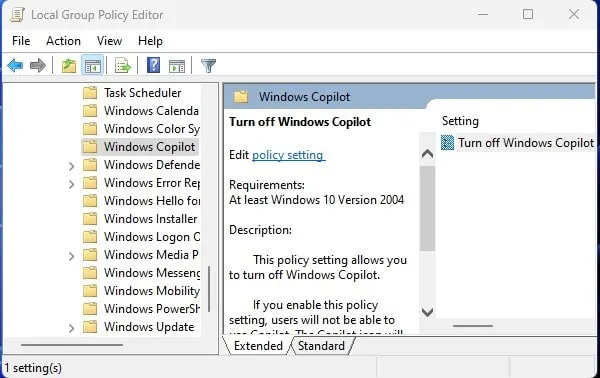
- Click on Turn off Windows Copilot > Edit policy setting.
- Turn off Windows Copilot window will appear. It will be set to “Not configured”, select “Enabled” and click on Apply > OK.
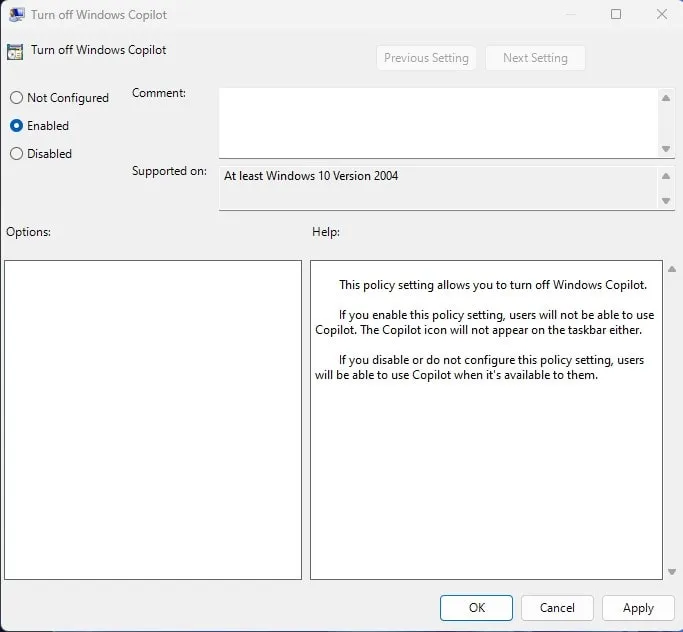
Do restart Windows and you might not be able to open it using the Windows + C keyboard shortcut.
If you want to re-enable Copilot then follow all steps and instead of Enabled, set it to “Not Configured”. And, do restart Windows afterward.

Method 3: Disable Copilot using the Registry Settings
If you’re on Windows 11 Home Edition, then this method is well-suited for you. Don’t make unnecessary changes in Registry Editor, since it manages system-level settings.
- Open Windows Search and type “Regedit”. Registry Editor will appear in search results. Do open it.
- UAC Window will appear, click on Yes.
- Navigate to the following directory in Registry Editor.
HKEY_CURRENT_USER\Software\Policies\Microsoft\Windows- In the left pane, you will see the Windows folder. Do right-click on it and click on New > Key.
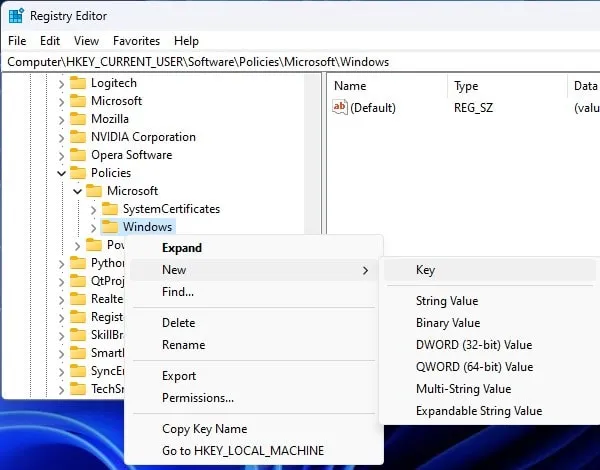
- Give the “WindowsCopilot” name to the new key. After that, click on the newly created “WindowsCopilot” key.
- Right-click on the blank area and then click on the New > DWORD (32-bit) Value option.
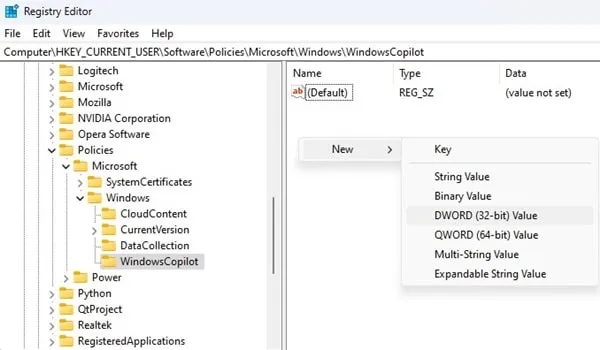
- A new key will be created, give it a new name “TurnOffWindowsCopilot”.
- Double-click on the “TurnOffWindowsCopilot” and in value type 1 instead of 0. This will disable the copilot on Windows.
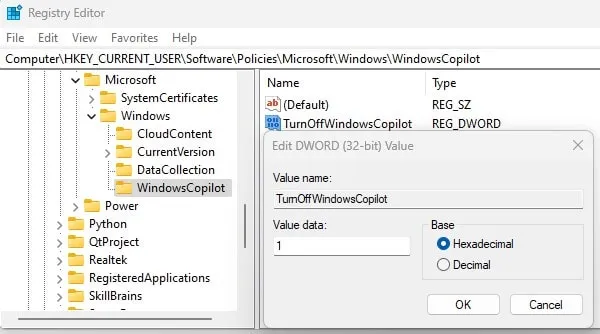
- Now, do restart the Computer and Copilot will not work in Windows 11.
- If you want to re-enable then just change the value to 0 from 1.
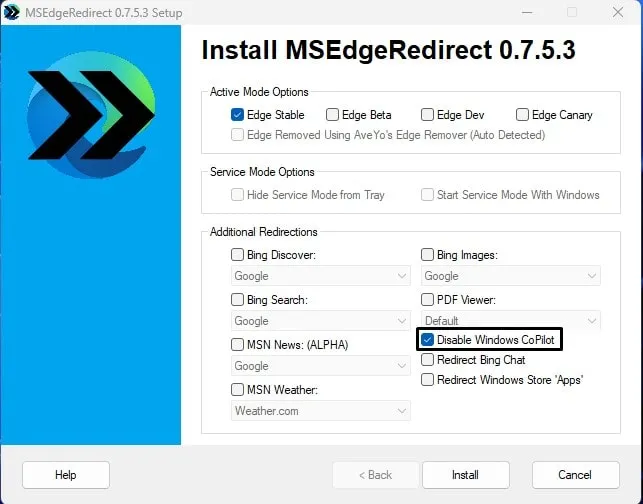
Method 4: Disable Copilot using MSEdgeRedirect
Using Registry Settings and Group Policy Editor can be complicated. Instead, you can use a dedicated tool to disable Windows Copilot. MSEdgeRedirect is a free and open-source utility to redirect Windows Searches from Microsoft Edge to the Default Browser. It also comes with an option to disable copilot, do follow these steps.
- First, download the latest version of MSEdgeRedirect from GitHub.
- Once, the setup file gets downloaded, do run it as administrator.
- Accept the license agreement and click on Next.
- Next, select active mode and click on next.
- A UAC window will appear, click on Yes.
- Next, select the “Disable Windows CoPilot” option and click on Install.
- Installed Successfully message will appear, click on Finish.
- Now, press the
Windows + Cshortcut and CoPilot will not open, instead settings app will open.
To re-enable CoPilot, do uninstall MSEdgeRedirect from Control Panel > Uninstall a Program.