If you want to share iPhone photos with anyone, you need to switch file types, as HEIC images don’t work cross-platform. And, it isn’t universally adopted as JPEG. Therefore, you can convert HEIC to JPEG on Mac for flexibility.
Mac, iPhone, and iPad all save images in HEIC format by default. And, when you transfer HEIC files across the Apple ecosystem, there isn’t any issue. However, when you share photos with Android and Windows users. Then, they might face trouble to open the image file format. Even, most of the websites ask for JPEG/JPG format while uploading documents. Although, with an extension, you can open the HEIC File on Windows 11.
What is HEIC?
High-Efficiency Image Format is known as HEIC. The HEIC format was originally developed by the Moving Picture Experts Group (MPEG). Images taken in this format are saved as *.heic file extension. The HEIC format uses a more efficient and modern compression method and supports 16-bit colors. The best thing is it is capable of keeping editing data, that’s why Apple uses this format. So that, the photos app can keep editing data, to edit pictures flawlessly.
This image format reduces the file size. But it is better than JPEG in terms of picture quality. It is capable of storing images encoded with multiple coding formats. Using HEIC format, you can store individual images and image sequences. iOS devices use this format to save live photos as well.
Are JPG and JPEG the same?
Yes, both JPG and JPEG refer to the same image file format. “JPEG” stands for Joint Photographic Experts Group. JPG is the shorter version of JPEG. JPEG is used by digital cameras and other devices that deal with photographs, like smartphones. Earlier versions of Windows used to allow three-letter extension names. That’s why, JPEG is shortened to JPG.
However, macOS comes with a JPEG converter, so your images will get converted into JPEG. Yes, you can rename the extension to JPG if you like.
Contents
Convert HEIC to JPEG on Mac
Bulk Convert HEIC Images to JPEG.
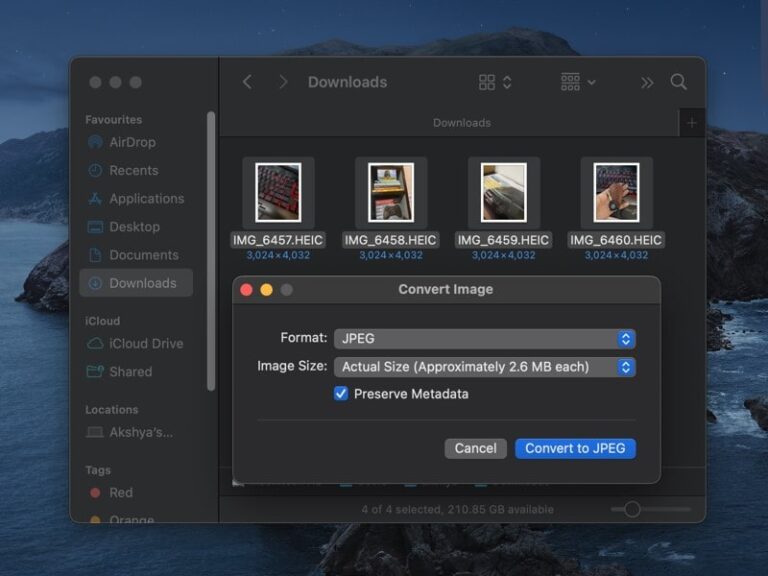
Suppose you have AirDrop multiple photos to Mac. And, all images are in HEIC format. Then, you can use macOS built-in Image Converter. It allows the conversion of images in JPEG, PNG, and HEIF. Even, you can modify the image size in Large, Medium, and Small. Yes, you can keep the actual size of the image, if you want to keep image quality intact.
- First, select all HEIC Images on your Mac.
- Do right-click after selecting images, and the Context Menu will open. Go to Quick Actions > Convert Images.
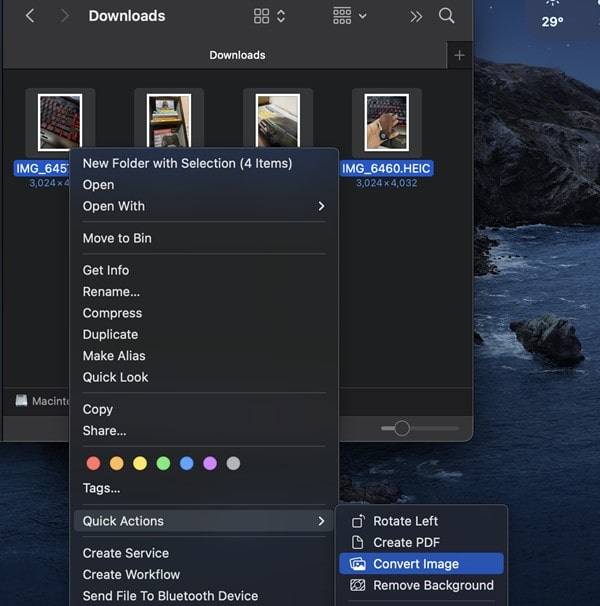
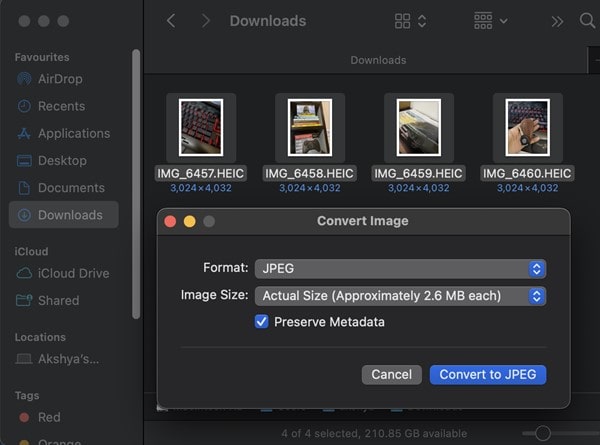
- A small Convert Image window will open. You can now select the format or image size as per your choice. Or, just keep the format to JPEG and the image size to the actual size.
- Click on Convert to JPEG.
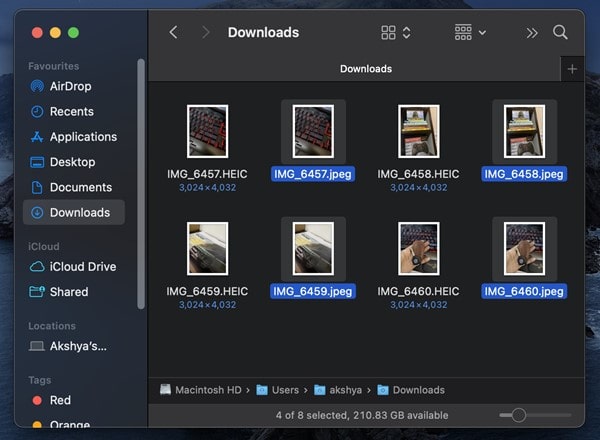
That’s it all images will now converted into JPEG format. You can find JPEG images at the same location, where all your HEIC images are stored. So, that’s how you can Convert HEIC to JPEG on Mac.
Convert HEIC File to JPEG using Preview
Bulk Image conversion is a good option. But, it has some limited format and options. You can get more image conversion options if you export images. The preview app export option will allow you to convert images into JPEG, JPEG-2000, OpenEXR, PDF, PNG, and TIFF. Or, you can use it to convert JPEG to HEIC as well.
- First, do double-click on an image to open it in Preview.
- After that, click on File > Export.
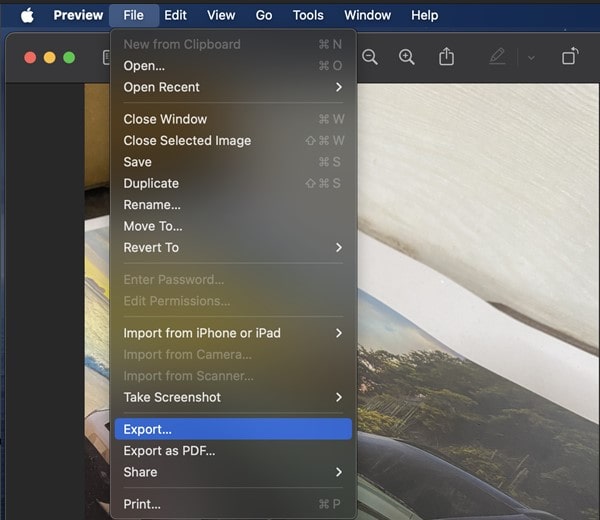
- The Export window will open. From here, you can change the file name, and add a tag, and location to save JPEG images, image format, and quality. It also shows how much image size will be after export.
- Once selecting all required options, click on save.

That’s it, the HEIC image will get converted into JPEG format.
Capture Photos in JPEG on iPhone
If you haven’t made any changes in your iPhone settings. Then, your iPhone might be capturing images in HEIC format. And, videos in HEVC codec. This is due to the High-Efficiency mode being selected in the Settings App. You have to switch to “Most Compatible” to capture photos in JPEG and videos in H.264 codec.
- Open Settings App. Scroll down and tap on Camera.
- Tap on Fomats.
- Select the “Most Compatible” option.
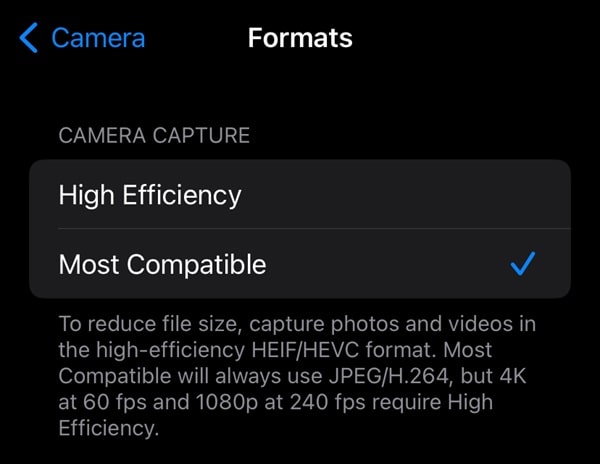
- Open the Camera App and capture a picture. Now when you see image information, you will see it’s saved as JPEG file format.
Trasnfer iPhone Photos in JPG
After changing the iPhone Camera settings, the iPhone will start taking pictures in JPEG format. But, what about the existing HEIC photos? Well no worries, by changing Photos App settings. You will able to transfer all your HEIC photos to Windows and Mac in JPEG format.
- Open the Settings App on your iPhone.
- Scroll down and tap on the Photos.
- Photos App settings will open, scroll down, and go to the “TRANSFER TO MAC OR PC” section. Here you will see two options.
Automatic – This option will convert photos into JPEG format when you connect your iPhone to a Windows PC using a cable.

Keep Originals – This option will keep all original formats, like HEIF/HEIC or JPEG intact.
- Select the Automatic option.
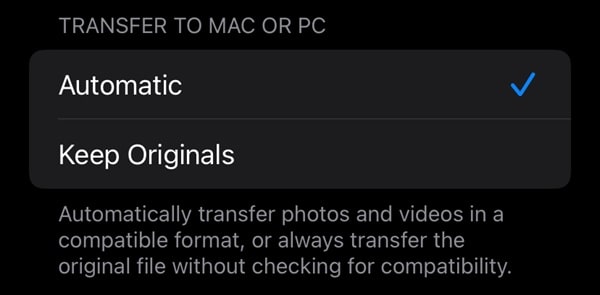
- Now, open a HEIC image in the Photos app, and tap on the share icon. Now, do share the image on Gmail. And, it will get auto-converted in JPEG.